Small Engine Ignition Coil Resistance Chart
What is a small engine ignition coil?
A small engine ignition coil is a component that transforms the low voltage from the battery into the high voltage needed to ignite the fuel-air mixture in the engine's combustion chamber, ensuring proper engine operation.
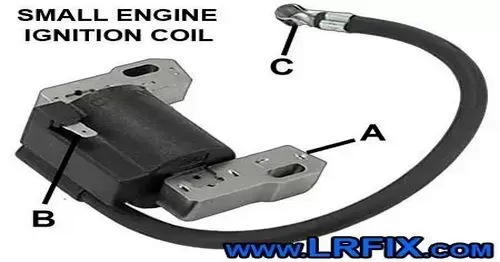
From the coil diagram: A = Coil Base , B = Kill Wire, C = Spark Plug Wire.
Before we get into the nitty-gritty of the chart, let's understand why ignition coil resistance is essential. In a 2-stroke engine, the ignition coil is responsible for generating the spark that ignites the fuel-air mixture.
Measuring the resistance, measured in ohms, of the ignition coil is a diagnostic step to ensure it's functioning properly.
2-Stroke Ignition Coil Resistance Chart
Here's a simple resistance chart to guide you:
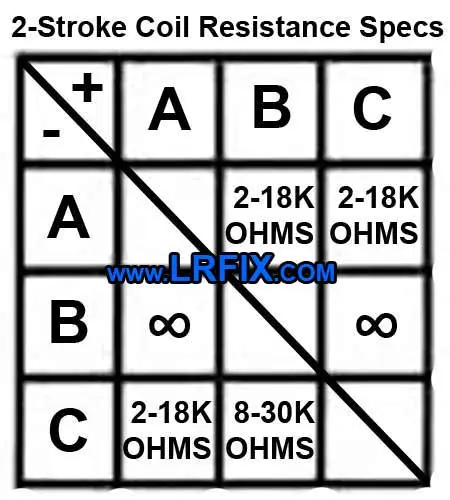
Make sure you connect the positive and negative leads of your multimeter to the right section, as shown by the + and - in the top left corner of this ignition coil resistance chart.
Remember, these values may vary slightly based on your specific make and model, so always refer to your manufacturer's guidelines.
LRFIX also has a testing spark plug coils guide for vehicle engines.
How to Use the Chart
To test your small engine ignition coil with a multimeter set it to the 30k-40k ohm(Ω) setting and prepare to take seven different measurements with the leads, as follows.
- #1 - Negative(Black) lead to A + Positive(Red) lead to B
- #2 - Negative lead to A + Positive to C
- #3 - Negative lead to B + Positive to A
- #4 - Negative lead to B + positive to C
- #5 - Negative lead to C + positive to A
- #6 - Negative lead to C + positive to B**
**Because the ignition coil has increased current resistance in one direction you will need to repeat step#6 with the leads reversed and you should get a different reading.
Potential Problem on Some Machines
Without expensive testing equipment its difficult to get a primary coil resistance reading with many newer coils on twin cylinder engines. They have an embeded chip regulating the flow of current.
Workaround: Disconnect the "Kill Wire" (location B on the coil image above) from the base of both coils and try to start the engine. In my experience the kill wire causes as many if not more starting issues than the coil itself.
That's because all of the safety features of your application require the kill wire to be properly connected. Disconnecting the kill wire effectively disables the safety features temporarily.
If the readings are normal with the kill wire disconnected it's a sign something else is wrong with your machine, and the coil is likely fine.
Get Hands-On with Your Engine
Now that you have this handy chart, you can confidently check your 2-stroke ignition coil resistance. Keeping this vital component in check ensures a smooth-running engine. So, go ahead, get hands-on, it's a good way to learn how your machine works!
Safety: Remember to reconnect the kill wire to your ignition coil because all of the safety features require it to be properly connected. Always disconnect the spark plug wire when working on small engines.

 Size Chart")

